Our local tulip thieves are at it again with the blooming of our late tulips. This time they didn't even carry them to the next block (as was done with our early tulips) --- after picking them, they just threw them down in our yard.
I was so angry . . . . I came right in and sketched them before they wilted anymore, and in the process of observing their beauty up-close lost my anger. Sketching is a wonderful antidote!

Saturday, March 31, 2012

Wednesday, March 28, 2012
March 2012: New Sketchbook Trial
This time I am trying XL Mix Media sketchbook from Canson. This was the very first page and you can see that one watercolor layer made this paper buckle and so far I was not able to lift anything when painting with watercolors in this sketchbook: everything is absorbed immediately.One layer works great - but as soon as you do more - it turns grainy. I tried color pencils and different pens and they worked great so far. More scans so come :)

Wednesday, March 21, 2012
A Cross-pollination demo--Windows!
Hi all! I needed to do a demo for the class I'm giving--people kept asking about how I painted the windows in the old mill painting at top-- but I don't have time to make a video or figure out where to upload a PDF, so I'm going to aim them here!
However! You can do all of those things...there's no right or wrong way to paint windows. Observation is your best tool...there are so many different kinds of windows, you just need to pay attention to what you see, and experiment a little.
There are quite a few different approaches to windows in my Travel Sketch set on Flickr and a few more in my Urban Sketches set, as well as some duplicates.
Ready to try a nice Louis Comfort Tiffany stained glass window??
Me either!
And you're right, this isn't journaling, strictly speaking, except I did the demo in my Strathmore Visual Journal... :-D
 |
| ...and by the way, I just painted around, carefully, here... |
 |
| So first, I just sketched a normal double-hung window... |
 |
| And then painted around the window and sill... |
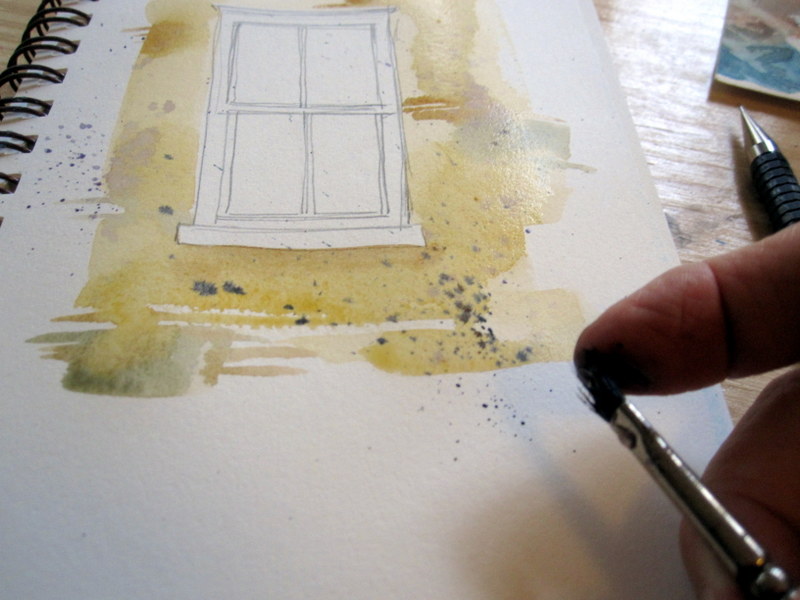 |
| I added a little contrasting spatter for texture, using a small oil-painter's bristle brush and my finger. And yes, I always get it all over me! |
 |
| Then I carefully added some of the shadows...I pushed the color a bit... |
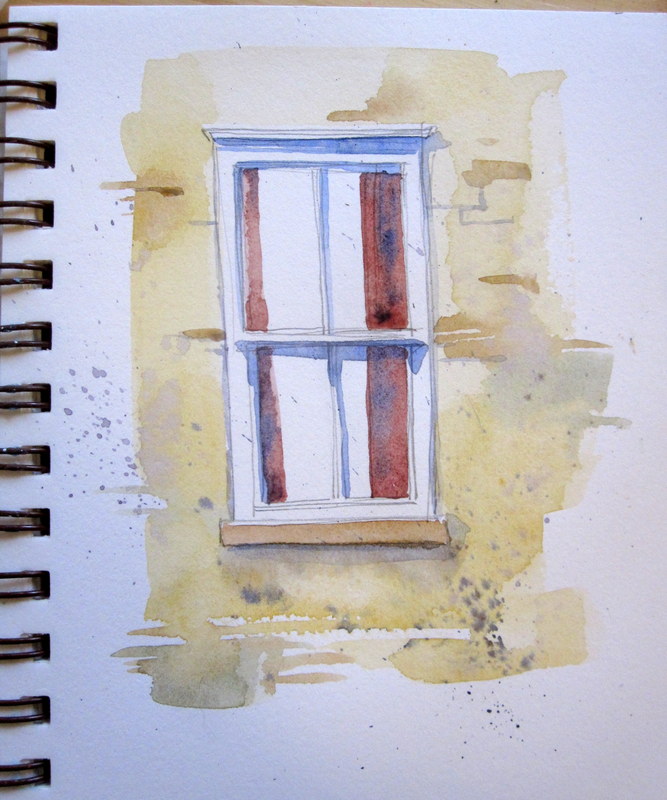 |
| ...and added the curtains. |
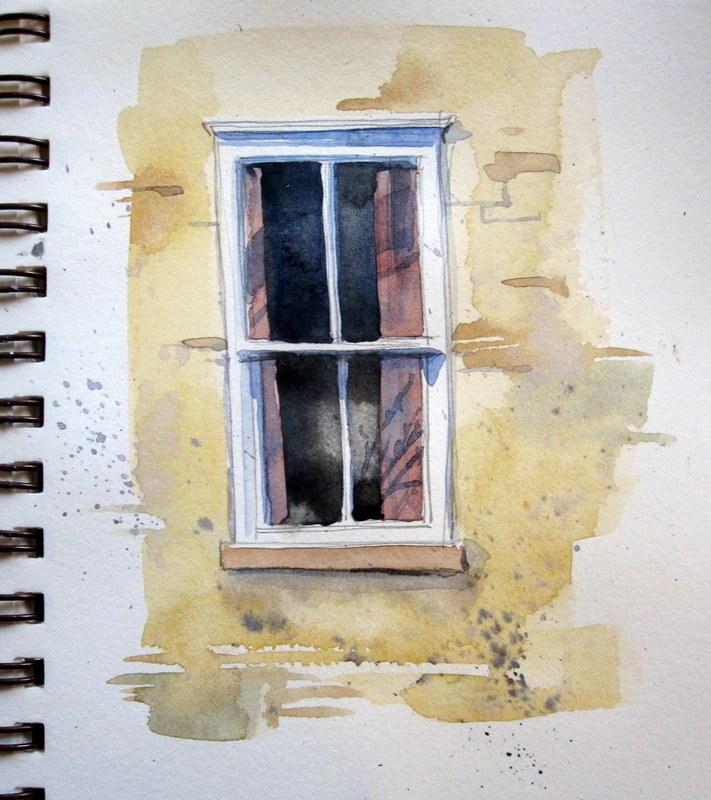 |
| Finally, I painted in the dark shadowy windows and added a suggestion of reflections when that was dry...but basically, just painted around, no mask, no scraping, no lifting. |
However! You can do all of those things...there's no right or wrong way to paint windows. Observation is your best tool...there are so many different kinds of windows, you just need to pay attention to what you see, and experiment a little.
 |
| Here, I scraped through a damp wash with the end of an aquarelle brush to lift the lights...the one on the right, I just left spaces for the crossbars or mullions. |
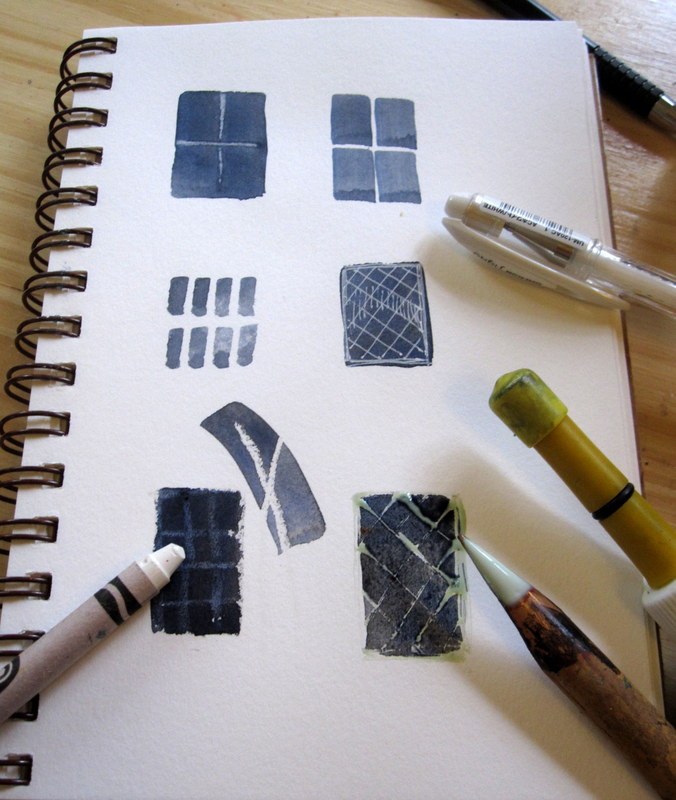 |
| ...and then went wild with a bunch of other techniques! My Crayon didn't work that well, so I tried a piece of candle wax--and ended up lifting the pigment off the crayon lines with a damp, clean brush and blotting away the extra color. (That's a bamboo pen applying liquid mask at lower right...easy to clean once the mask is dry.) |
 |
| See what I mean? You can't really say how to paint windows, because there are literally dozens of different kinds...I did quick sketches of a few I found in an old book on English cottages... |
 |
| So here are a few of the ideas to try on some simple windows...there are many, many more. |
Ready to try a nice Louis Comfort Tiffany stained glass window??
Me either!
And you're right, this isn't journaling, strictly speaking, except I did the demo in my Strathmore Visual Journal... :-D
When is the ink really dry?

The ink was dry... It looked like dry ink everywhere but in one spot - where my pen made a blot earlier. I even tried it with my finger (though gently as on this paper Noodler's ink smudges easily).
But when I used my spray bottle.... i got THIS! :)
Sunday, March 18, 2012
Emergency Preparedness...
...so once in a LONG while I forget my journal or don't want to go back out to the studio for it...thank goodness I've got my accordion folder in the Jeep!
The other day we talked about finding time to sketch...this is one way I do it, as noted, I keep supplies handy EVERYWHERE.
Actually, I keep an accordion folder in both vehicles, one close to the computer, and sometimes one in the bedroom...I make them from scraps when I bind my journals!
The other day we talked about finding time to sketch...this is one way I do it, as noted, I keep supplies handy EVERYWHERE.
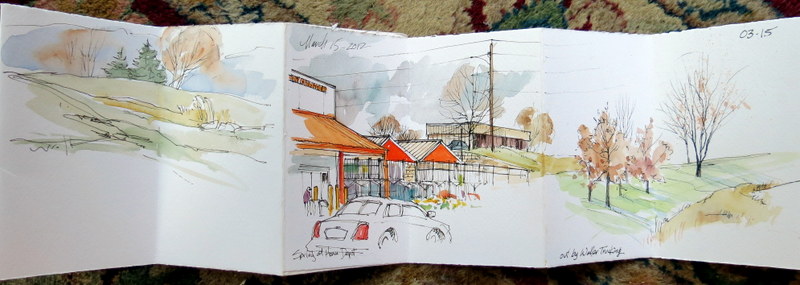 |
| I didn't have much time to do the two quick parking-lot landscapes, but LOTS of time while J. shopped in the Home Depot the other day...I was very glad I had my folding journal in the car! |
 |
| This is out by our library, where I often sketch while waiting... |
 |
| Here's the lovely bright colors at Home Depot... |
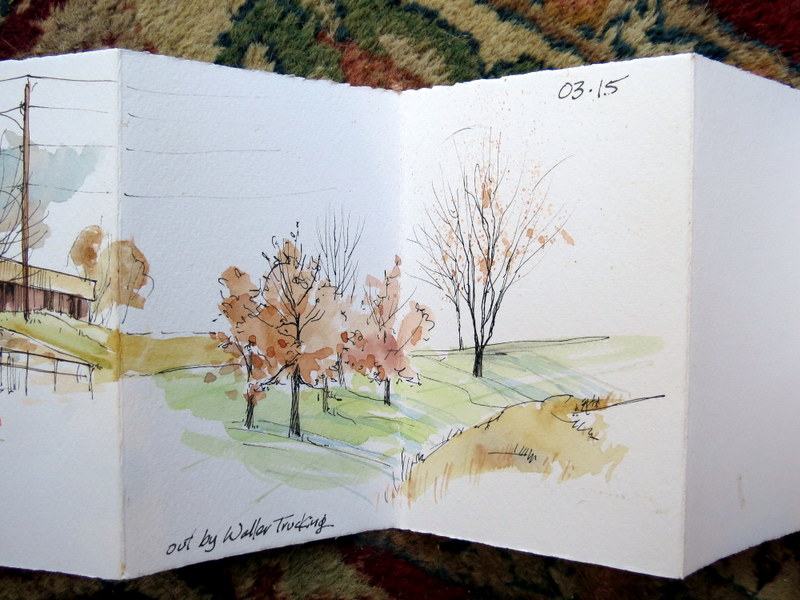 |
| And on the way home, the parking lot at WalMart...J. parked so I had a better view! |
Actually, I keep an accordion folder in both vehicles, one close to the computer, and sometimes one in the bedroom...I make them from scraps when I bind my journals!
Friday, March 16, 2012
News from our own Laura Frankstone...
...as many of you know, our dear friend Laura and her family have been through the wringer the past few years. Most recently, tragedy struck when they lost their full-term grandson--dealing with this has been a portrait in courage and human strength.
Daughter Kate and her husband Biff have found a way to bring something positive out of sadness, along with the March of Dimes...please read this post on Laura's blog, and if you can, help!
Daughter Kate and her husband Biff have found a way to bring something positive out of sadness, along with the March of Dimes...please read this post on Laura's blog, and if you can, help!
Wednesday, March 14, 2012
Waterbrushes and Watercolor Brushes
I FINALLY got the video done, reshot, tweaked, edited and uploaded!
People often ask me about waterbrushes, and I think I've tried them all by now...hope this helps.
I also cover the difference between waterbrushes and "real" watercolor brushes, and when and why to chose one over the other. Unless you use a pointillist technique, a waterbrush isn't going to satisfy you for nice juicy washes of any size. I use mine when I'm traveling, working in my journal, pressed for space, needing to letter something...but never when I'm working 9 x 12 or larger!
Making Time
HOW TO FIND TIME TO MAKE ART?
MAKE AN APPOINTMENT
Set a time that’s YOURS, and stick with it. Make an appointment with yourself. If you absolutely HAVE to break that appointment, don’t get upset, just reschedule, and then keep that one.
FIND A PAL and ENLIST THE FAMILY
If it helps, find someone to do art with...perhaps having more than one will help you find time, especially if you have a responsibility to them (and to yourself!)
Enlist your family’s help. Let them know this IS important to you! You’ll be a better spouse, parent, son, daughter, whatever, if you have time to express your creative side.
 |
| I always make use of waiting time to sketch...makes the time pass a lot faster, allows me time to be creative when I might not otherwise, and it helps keep me on an even keel! |
USE BITS AND PIECES OF TIME
Sketch in time that’s otherwise wasted–waiting for a plane or your meal in a restaurant or the doctor’s office. You may not be able to get out the whole paint set, but you CAN do a sketch and paint it in later if you wish.
UNPLUG!
Turn off the TV, don’t text, don’t grab a newspaper or magazine or even a book in those moments that might otherwise pass unnoticed–sketch instead! (Thoreau once wrote “As if you could kill time without injuring eternity.” Our sketches may not be eternal, but you WILL be amazed at how much more time you have to be creative. If you need more encouragement, I’ll bet you find something that speaks to you here: http://www.quotegarden.com/carpe-diem.html
(People often ask me how I get so much done...that’s how! I turned off the TV in 1997, and only occasionally watch a video. I get our small local newspaper with real people news–I figure any serious news I need will show up on the computer...)
KEEP IT SIMPLE
If you know time’s at a premium, just try for pen, pencil, and perhaps a little watercolor kit and a waterbrush, if you’re working small. (If you’re working larger–9" x 12" or larger–you’ll want bigger brushes and a decent source of water.)
Make Like A Boy Scout and BE PREPARED
One thing I do that makes it easy to find creative time is keep art supplies handy, in a variety of places in my house, in my purse/field bag, and in my Jeep. I’ve even got a little set next to my bed, as well as one by the couch and one by my computer. That way if I find myself with a bit of time, I can pick up a little watercolor set, a pencil or pen or two, and go to it!
Note: One big advantage to buying tube paints and creating your own pan colors, which we discussed in this post, is that you can make LOTS of these little watercolor sets from only a few tubes, and keep them everywhere. You don’t have to fill the pans all the way up, I’ve got watercolor sets that have had the same paint in them for years–it all depends on how often you use them!
And as some people have said–if you REALLY want to find the time, you will.
--------------------------
Finding time is one of the things on our poll in the right-hand sidebar--if you haven't voted for what you'd most like to see on this blog, please feel free!
Tuesday, March 13, 2012
Three Experiments

I tried three things this month: watercolor book from Pen&Ink and Hero fountain pen (Hero M86 Calligraphy Pen) with Noodlers Lexington Gray Booletproof ink. The combination of all three is a major failure...
Pen& Ink paper is not taking watercolors well and all Lexington Gray is blotching ugly. Even the thinnest line in a few seconds becomes a lichen-covered stick. And no booletproof ink is waterproof or water resistant on this paper. It's not even smudge proof! So I am very disappointed with this sketchbook and will not use this paper again. Though ballpoint works great on it :)
Hero pen is something I need to learn how to use - but it's a lot of fun to experiment with! Variety of lines is amazing!
I do not have anything to say about Lexington ink as I am waiting for a better paper to try it on :) My previous experiments included watering down black inks to get some gray and they worked fine - but this might be more consistent in the long run.
My big fat black journal 3
It's almost a year since my first post about my big fat black journal. A year later, and five books filled,


I'm more than ever grateful for this way of becoming and knowing who I am.

I continue to use my journal to document my ideas, my art process, and my doubts and dreams.

(I'm still messy.)

(I'm still about process, not product.)

I'm still using my adored Stillman and Birn Alpha series 8 1/2" x 11" hardbound sketchbook, one every three months.
I still use pen and wash to respond to something beautiful before my very eyes.

If you need me, follow the trail of paint splatters and ink smudges. You'll find me, still here.
Tuesday, March 6, 2012
COOL sketch!

I got a huge kick out of this sketch by Len Sime Druskovich on our Artist's Journal Workshop Facebook group, and had to share it with you--AFTER asking permission of course, which was graciously granted!
Thank you, Len!
Please feel free to join us on Facebook and share your work.
Monday, March 5, 2012
Making Your Own Pan Paints
Making Your Own Pan Paints
I get asked about this, occasionally--and just recently on the free Strathmore class I'm teaching, so I thought I'd do a dual-duty post!
Some artists like to squeeze out fresh tube paints every time they work--I've always been sort of the frugal type, and prefer to re-wet my colors till they're all gone, whether in my studio--on my big beloved old John Pike Standard Palette
You can buy paint in pans, of course (though it's much easier to find half pans than full, no idea why) but it's a piece of cake to make your own. I love my old standby, Winsor & Newton.
It’s really easy to do, and have the colors you want in your paint box, as well as to refill them any time they get low...I believe it’s even a bit less expensive, too.
I was told by one company that their tube paints weren’t meant to be used this way, they weren’t formulated to re-wet as the commercial pan colors are, but I say “nonsense!” I’ve been doing it for 40 years...
DO spray or drip water on your pans of paint a bit before you're ready to work...it makes all the difference, as you can see below!
 |
| Click to find this illustration here to see what a different spritzing a minute or two before you're ready to paint can MAKE in how rich your colors are. I list all the color names there... |
That said, some colors or brands DO re-wet more readily than others. Horadam Schmincke works well, as does Daniel Smith...but as I say, I’ve used Winsor & Newton for decades and they work beautifully for me. They're still my go-to brand for most colors.
(Lovely as M. Graham paints are, they tend NOT to set up well under some conditions, since they use honey as a binder. They may run or “drool” for you...)
So what's next...

If your palette box already has divisions, like the little one above, you just squeeze however much paint into each one that you want...fill them all the way, just put a dab, or fill halfway, it’s up to you. (If it’s a paint I use often, I tend to fill it up.)
You can also buy empty half or full pans, made of plastic. They’ll either fit directly into your palette divisions, as in some of the older style of metal watercolor boxes, or you can stick them down with rubber cement, so you can re-position them. Most palettes will allow you to use a combination of full and half pans, if you like...I use half pans for those colors I use less often, or that I want to experiment with before making permanent additions to my repertoire!
 |
| This is my ancient Winsor & Newton dinosaur, being rehabbed now to remove the rust! I've used it for decades, and it's traveled all over the country. You can see it will take full or half pans held in place by bent metal strips. |
Finding Empty Pans
Daniel Smith has the empty plastic pans here: http://www.danielsmith.com/Item--i-050-050-001 (full pans) or here http://www.danielsmith.com/Item--i-285-240-003 (half pans)
Jerry’s Artarama has them: HERE
Kremer Pigments has them here:
(full pans)
(half pans)
Cheap Joe’s has them here: (full pans)
Or try your local art supply store!
(The most difficult thing is figuring out how they’re listed on the site! “Empty full pans” sounds weird...)
I've learned it may work best to start in the corners first and then fill the middle...and be aware, the paint will shrink as it dries. You may wish to fill partway, let it set up, then finish filling to minimize cracking. (If your paint pops out of the plastic pan, just re-wet the back of the mound of paint and press it back into place, or use a dot of gum arabic as "glue.")
Allow the paints to set up for at least 24 hours to several days, so they won’t travel when you take them out in the field.. Then when you’re ready to paint, simply spray or drip clean water on the pans for easily-lifted, intense color, as in the illustration above.


NOTE: I was able to find a few extra vintage watercolor boxes which I've put in my eBay store...check 'em out, they're FUN.
* If you'd like, take a peek at my Flickr set of watercolor boxes and palettes. Lots of ideas here, including my favorite Prang box re-hab, above! (I've refilled those pans 3-4 times since I shot those photos, and both my Prang palettes now have a few half pans for incidentals. They've traveled clear across country with me. I think using the same old metal palettes I had when I was a kid frees up something in my soul!)
And if you'd like to see a video on making your own palette boxes, it's here:
Sunday, March 4, 2012
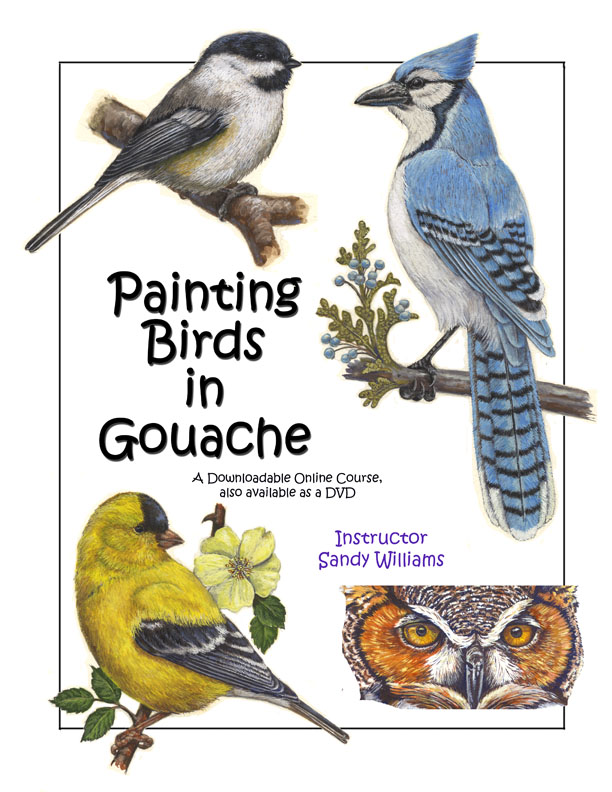
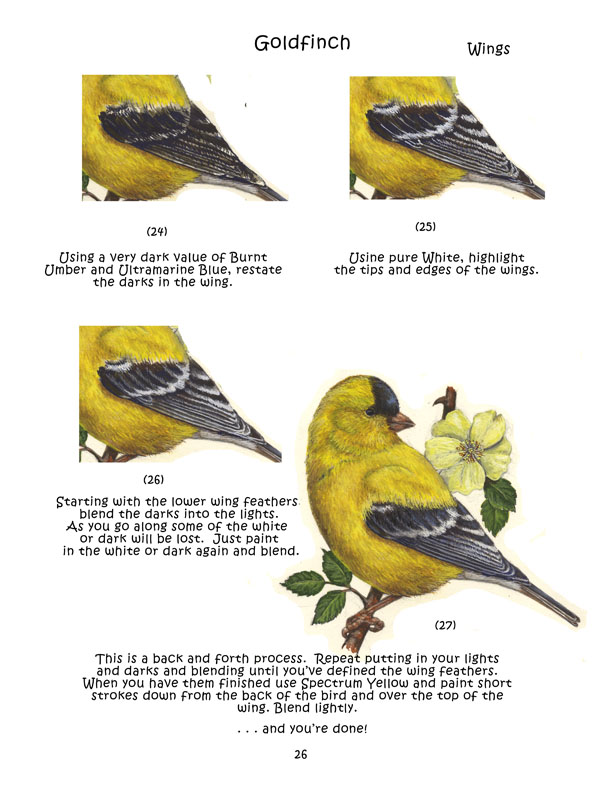
Sandy Williams - Painting Birds in Gouache

Friday, March 2, 2012
Use Color Fearlessly: A Color Theory Workshop
 |
| Above: Selection of paintings from Roz Stendahl, demonstrating her approach to color using a variety of media. |
Besides being open to non-calligraphers this workshop is open also to artists of all skill levels. We will focus on blending colors from a limited palette of watercolors in order to understand the relationship of the colors. Students will develop a working understanding of color through experimentation and guided exercises which are chosen to provide useful color information regardless of drawing or painting expertise. This workshop will equip students with the skills needed to develop a personalized palette. I hope you will consider spending a bit of your summer in Minnesota exploring color with me.
Thursday, March 1, 2012
Watercolor Paper and Ball Point Pen
Re-posting form my blog:

My last couple of sketchbooks were a little odd - craft paper or thin dry media paper (though I gave it quite a lot of watercolor and gouache coverings:) And I longed for a good old white sturdy watercolor surface to work with. When the time came quick review of the "reserve" box showed that I have this watercolor "Pen and Ink" horizontal book stored - COOL! I splashed some color right on the first spread!
However most of the pens in my "usual rotation" were bleeding, scratching, and overall misbehaving. While running some tests I picked up bic ball point and... what can I say - 1/3 of the book is filled now and most of it is black and white, done with the same bic ballpoint... see below :)
Subscribe to:
Posts (Atom)